Extend Maia’s Capabilities
While Maia has built-in actions, as well as 3rd party connection actions, you can teach it new ones by defining custom API calls. Once created, Maia remembers and uses them intelligently in future workflows.Custom actions let you integrate any web service with a RESTful API, from proprietary internal tools to niche third-party services.
When to Create Custom Actions
Internal Tools
Your company’s custom CRM, inventory system, or proprietary database
Niche Services
Industry-specific tools not in Maia’s built-in library
Private APIs
Services behind authentication
Legacy Systems
Older systems with custom APIs that need specific formatting
How It Works
Custom actions are organized into Platforms and Actions you can define. Each platform represents a service or system, and each platform can have multiple actions. The key to making custom actions work effectively is using natural language descriptions. Maia reads these descriptions to understand what each platform and action does, when to use them, and how to fill in the required parameters automatically during workflow execution.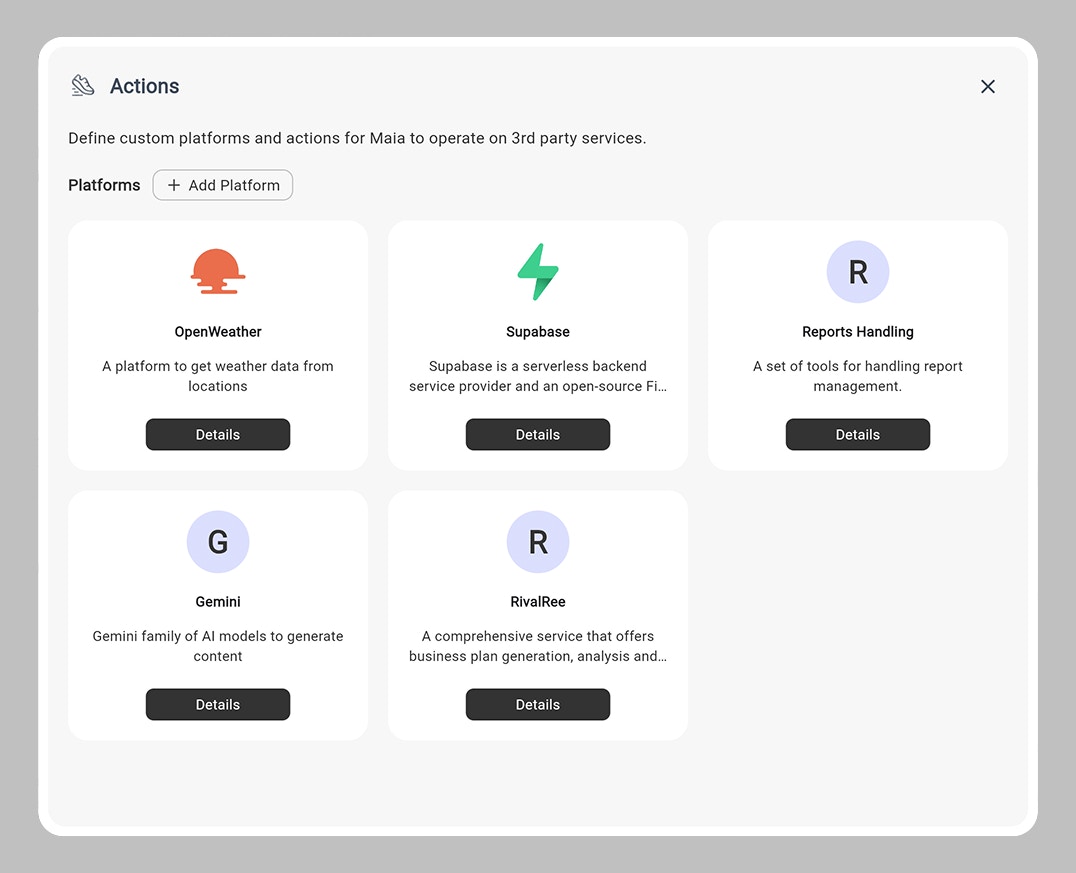
Managing Platforms
The Actions menu displays all your defined platforms. You can:- Add Platform: Create a new platform to group related actions
- Enable/Disable Platforms: Control whether Maia can discover and use actions from a specific platform
- Edit Platform: Update the platform name and description
Creating and Managing Actions
Within each platform, you can define multiple actions. Each action represents a specific HTTP request (API call) that Maia can execute.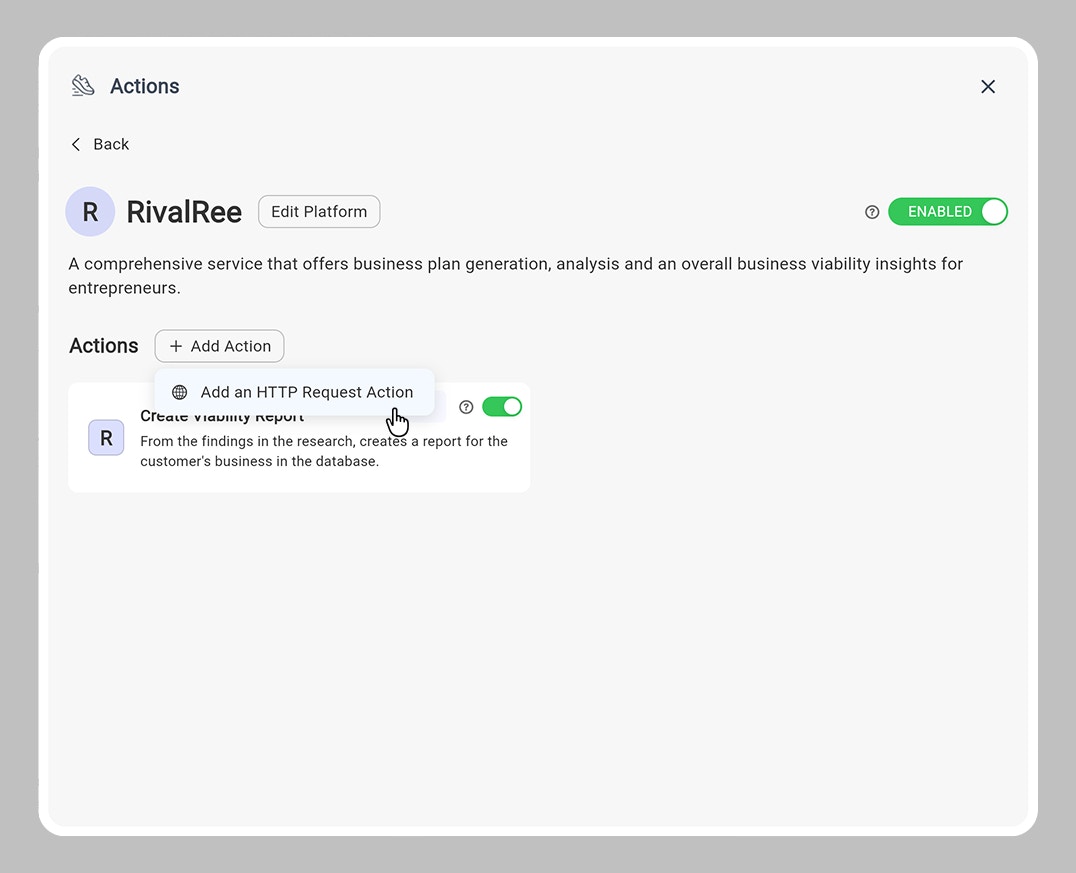
Action Controls
For each action, you can:- Enable/Disable: Toggle whether Maia can use this action in workflows
- Edit Action: Modify the action configuration
- Delete Action: Remove actions you no longer need
Adding an HTTP Request Action
To create a new custom action, click Add Action within a platform. Then choose Add an HTTP Request Action.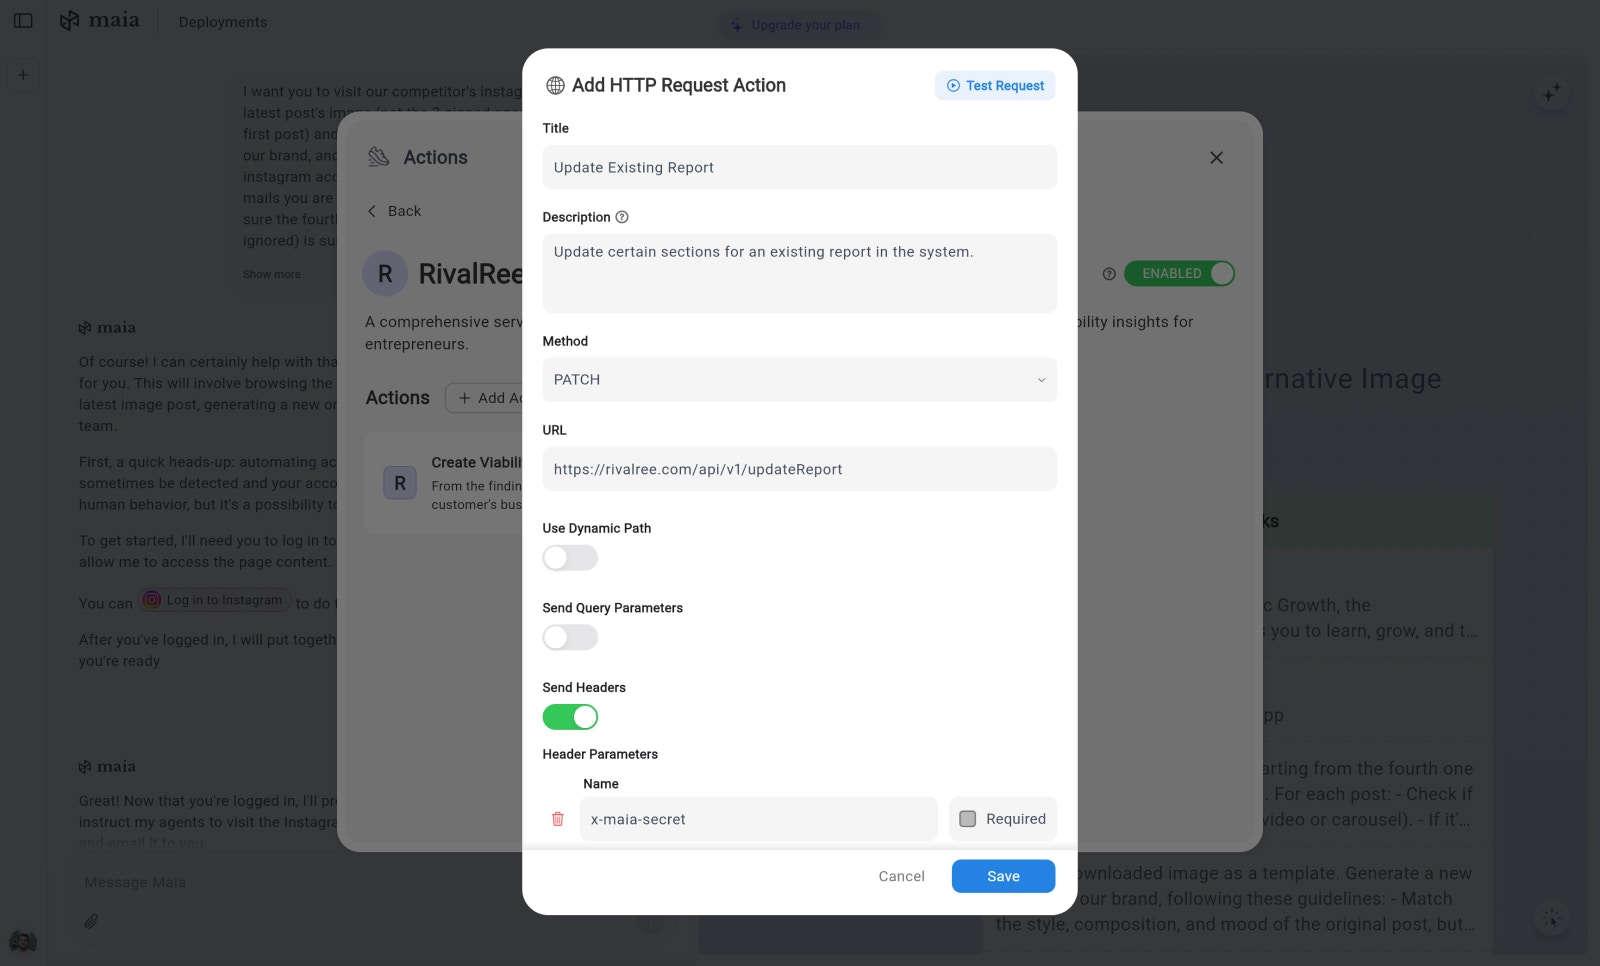
Basic Information
Title: The name of your action (e.g., “Read Database Entry”, “Get User Info”) Description: A brief explanation of what the action does. This is crucial — Maia uses this description to determine when this action is relevant to use in a workflow.Request Configuration
Method: Choose the HTTP method for your request:GET- Retrieve dataPOST- Create or send dataPATCH- Update existing data
https://api.example.com/data)
Use Dynamic Path: Toggle this if parts of your URL need to be dynamically filled based on parameters
Parameters
You can define four types of parameters:Query Parameters
Parameters sent in the URL query string (e.g.,?user_id=123&status=active)
Headers
HTTP headers sent with the request (e.g., authentication tokens, content types) For each header, you can specify:- Name: The header name (e.g.,
x-maia-secret) - Required: Whether this header must be included
- Constant Value: Set a fixed value so Maia doesn’t need to determine it dynamically
Path Parameters
Dynamic segments in the URL path (enabled when “Use Dynamic Path” is toggled)Body Parameters
Data sent in the request body (for POST and PATCH requests)Parameter Configuration
For each parameter (query, header, path, or body), you can define: Name: The parameter name Description: Optional natural language explanation of the parameter. This helps Maia understand when and how to use it, what values are appropriate, and where to get the values from in the workflow context. Required: Toggle whether this parameter is mandatory for the request Constant Value: If a parameter needs a fixed value, enter it here. This is useful for parameters that are required but don’t change (like API keys, version numbers, or fixed configurations). When a constant value is set, Maia uses this value automatically without needing to determine it.Constant values are securely encrypted and remain completely private from the AI models powering Maia (Gemini, GPT, Claude) and their providers (Google, OpenAI, Anthropic). This ensures safe storage of sensitive information like API keys.
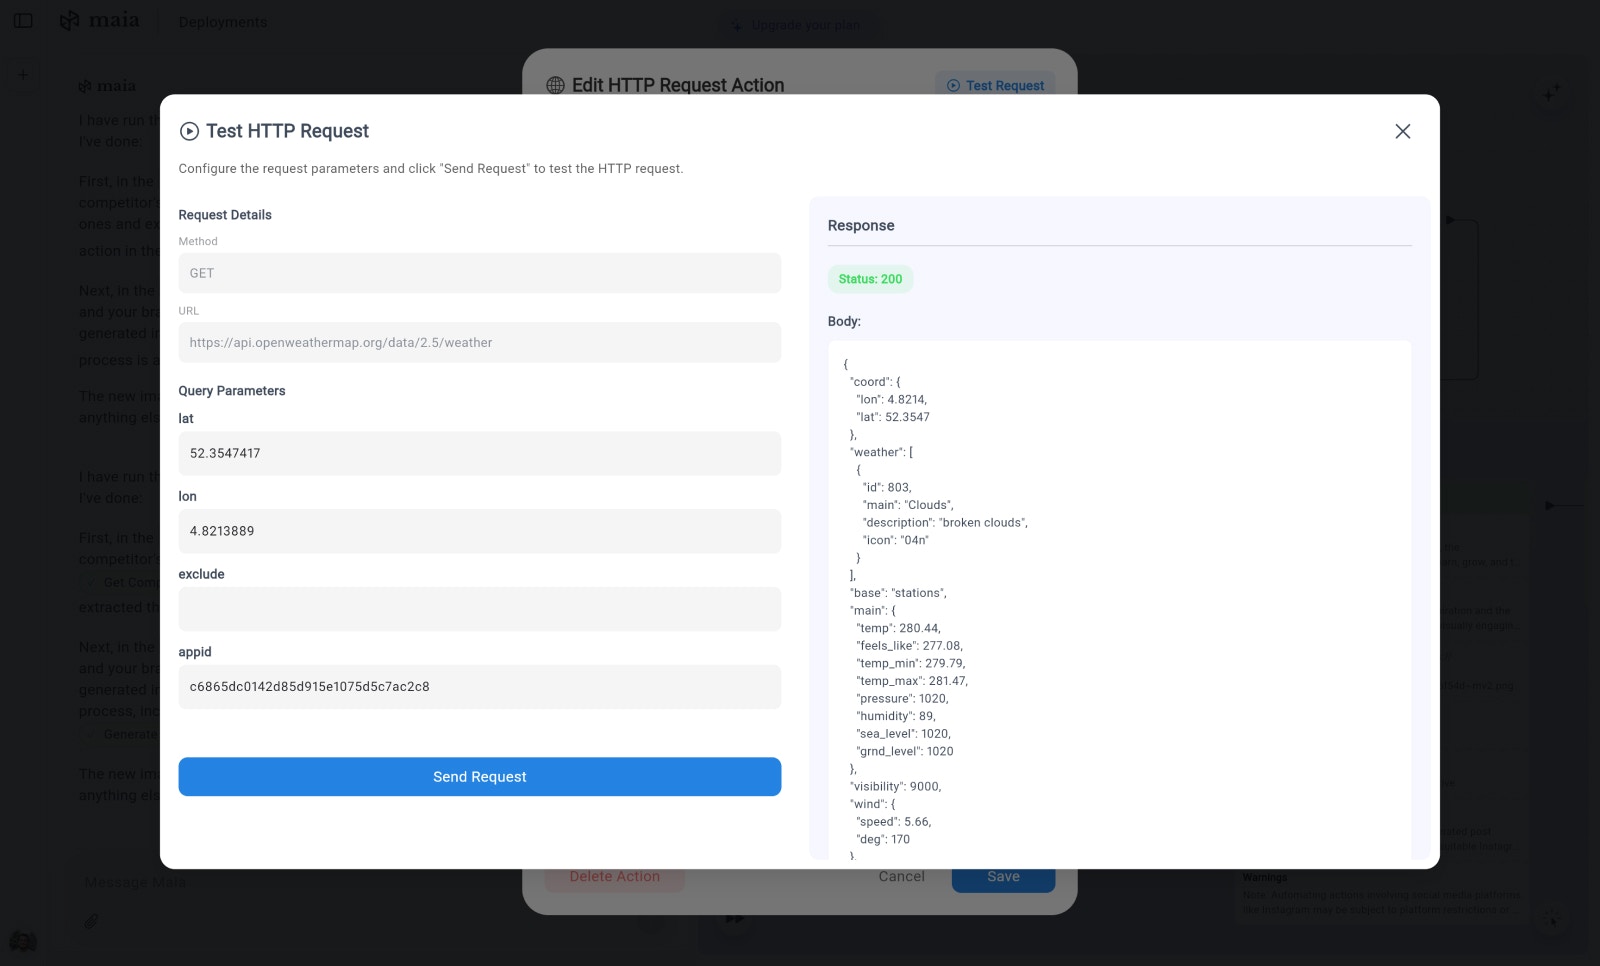
Testing Actions
Before saving an action, you can test it to ensure it works as expected:- Click Test Request to open the test interface
- The test screen shows your configured request details:
- Method (GET, POST, PATCH)
- URL
- Headers
- Body Parameters
- Manually provide example values for the parameters
- Click “Send Request” to execute the test
- View the response on the right side to verify the API call works correctly
Best Practices
Clear Descriptions
Write detailed, natural language descriptions for platforms, actions, and parameters. The better the description, the more accurately Maia will use them.
Use Constants Wisely
Set constant values for parameters that never change (API keys, fixed IDs, version numbers) to simplify Maia’s job.
Group Related Actions
Organize actions into logical platforms to keep your integrations organized and easier to manage.
Test Before Deploying
Always test your actions with example data to catch configuration errors early.
Next: Deployed Workflows
Learn how to deploy your workflows to run automatically